
A beautiful Christmas bow can make a plain tree, wreath, gift, or front door look professionally decorated in minutes. If you want to learn how to make a Christmas bow, the process is easier than it looks. With wired ribbon, a few simple folds, and a secure center, you can create a full, attractive bow at home.
This guide shows you how to make Christmas tree bows, simple gift bows, wreath bows, and larger decorative designs. You’ll also learn how to make an easy Christmas bow with ribbon, shape professional-looking tails, and choose the right ribbon for your project.
Quick Answer:
To make a Christmas bow, use 2–4 yards of wired ribbon, create 6–8 even loops, pinch the center tightly, and secure it with floral wire or a pipe cleaner. Add two tails, trim the ends, then fluff each loop until the bow looks full and balanced. This simple method works for Christmas tree bows, wreaths, gifts, doors, and tree toppers.
What Supplies Do You Need to Make a Christmas Bow?
You only need a few supplies to learn how to make a Christmas bow at home. For a medium decorative bow, start with 2–4 yards of 2.5-inch wired ribbon, 6–8 inches of floral wire or a pipe cleaner, and sharp scissors.
Wired ribbon works especially well because the edges contain wire that helps the loops hold their shape. For a beginner, this makes fluffing much easier than working with slippery satin or thin curling ribbon.
You’ll need:
- 2–4 yards of wired Christmas ribbon
- 6–8 inches of floral wire or one pipe cleaner
- Sharp scissors
- Measuring tape, optional
- Hot glue, optional for certain styles
- Small decorative ribbon for the center, optional
For a small present bow, you can use considerably less ribbon. For a large door or tree-topper bow, plan on 4–6 yards so the loops and tails have enough volume.
How to Make a Christmas Bow Step by Step
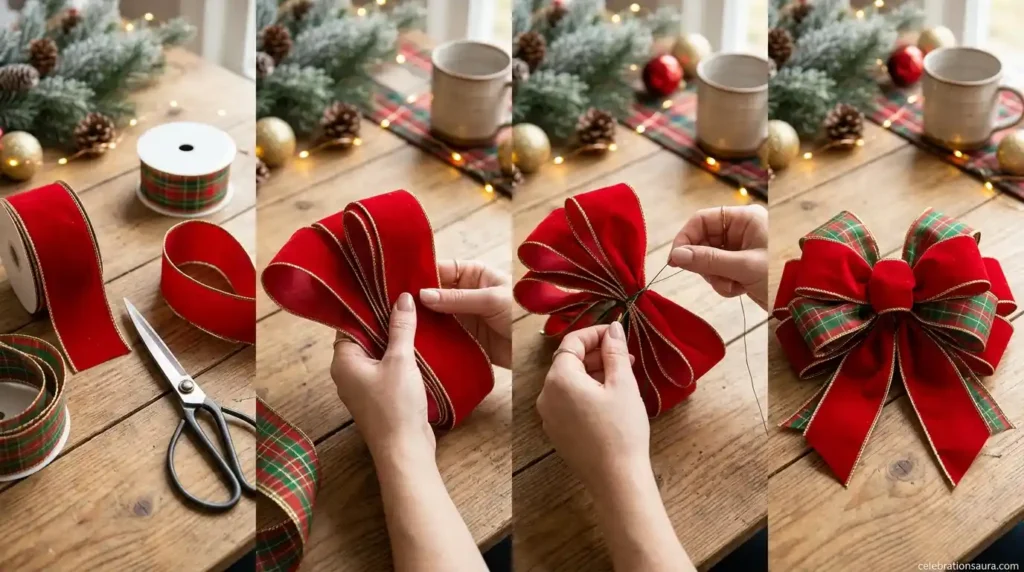
If you’re learning how to make a christmas bow step by step, start with one classic wired-ribbon bow. This method gives you a reliable shape without requiring a bow-making machine.
Step 1: Choose the Ribbon
Choose 2.5-inch wired ribbon for a versatile medium bow. Red velvet, green plaid, candy-cane stripes, gold mesh, and red-and-white patterns all work beautifully for Christmas decorating.
For a large wreath or front door, 4-inch ribbon creates a stronger visual impact. For gifts, 1–2-inch ribbon usually looks more proportional.
2: Leave the First Tail
Pull approximately 10–12 inches of ribbon from the spool and leave it hanging as your first tail. Pinch the ribbon at that point with your thumb and finger.
Don’t cut the ribbon yet. Keeping it attached to the roll gives you more control while creating the loops.
3: Create the First Loop
Bring the ribbon upward and make a loop about 4–5 inches long. Pinch the ribbon firmly at the center.
If the ribbon has a printed front, twist it at the center so the decorative side faces outward. This small step makes a noticeable difference with one-sided ribbon.
4: Make a Matching Loop
Create another 4–5-inch loop on the opposite side. Pinch and twist the center again.
Keep checking the two loops against each other. Matching loop sizes will make the finished bow look intentional rather than lopsided.
5: Continue Building the Bow
Repeat the process until you have 3–4 loops on each side. A classic full bow therefore has about 6–8 main loops. This loop count is also commonly used in detailed wired-ribbon tutorials.
Don’t worry if the bow looks messy at this stage. The final fluffing step will separate the loops and create the rounded shape.
6: Add the Second Tail
Leave another 10–12 inches of ribbon for the second tail. Cut the ribbon from the spool.
Now you should have a center packed with loops and two long tails hanging below it.
7: Secure the Center
Wrap floral wire or a pipe cleaner tightly around the pinched center. Twist it several times at the back.
The center needs to be tight enough that the loops don’t slide apart. This is one of the most important parts of how to make a christmas bow that stays full.
8: Fluff Every Loop
Pull the loops apart one at a time. Rotate them slightly left and right, then puff them forward.
Think of the bow as a small sculpture. The more evenly you spread the loops, the fuller and more expensive it will look.
Step 9: Shape the Tails
Let the two tails hang naturally, then cut each end into a V shape or diagonal point. A 10–12-inch tail works well for a medium decorative bow. If the bow will sit on a large wreath or door, make the tails 18–24 inches long for more dramatic movement.
How to Make a Bow With Ribbon for a Christmas Tree
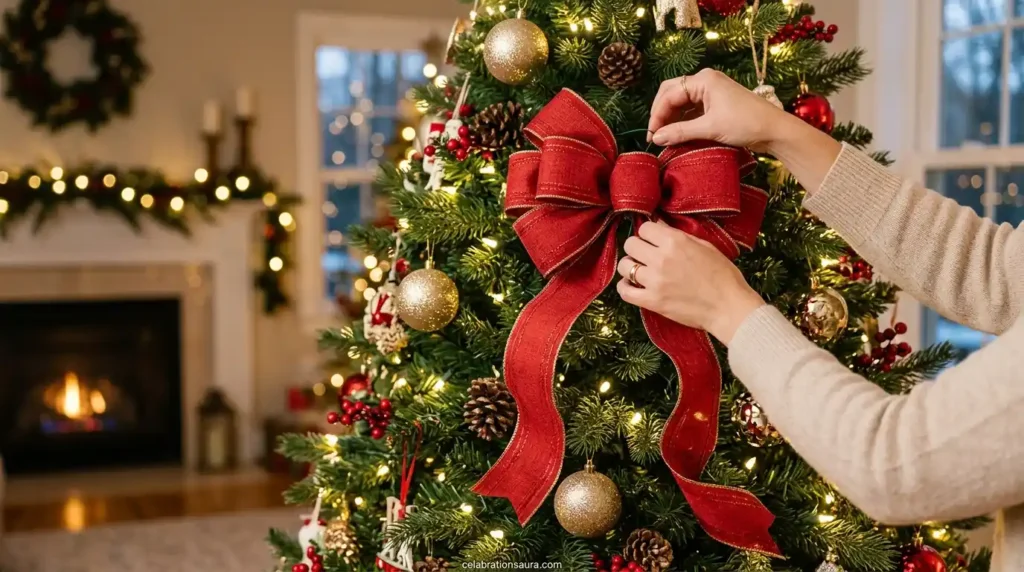
A tree bow should be full enough to stand out but not so large that it covers several branches. For an average 6–7-foot tree, a 2.5-inch wired ribbon and 4–5-inch loops create a balanced look.
To make one, create 6–8 loops, secure the center with floral wire, and leave two 12–18-inch tails. Attach the finished bow to a strong branch using the same wire.
For a fuller designer effect, layer two ribbons. Try a 2.5-inch red plaid ribbon with a 1.5-inch gold ribbon placed over it. Layering gives the bow more dimension without requiring twice as many loops.
How to Make a Bow for the Top of a Christmas Tree
A Christmas tree topper needs more height and longer tails than a regular ornament bow. Use 4–6 yards of wired ribbon and create 4–6-inch loops for a large 7–8-foot tree.
Instead of letting both tails hang straight down, angle them gently through the branches. This creates the classic cascading tree-topper appearance.
A small wire loop at the back can also help secure the topper to the tree’s central stem. If the tree is artificial, attach the bow before adding the final few ornaments around the top.
How to Make a Christmas Bow With Wired Ribbon
Learning how to make a Christmas bow with ribbon is especially easy with wired ribbon because the edges help each loop maintain its shape.
Use approximately 2–4 yards for a medium bow. Build 6–8 loops, pinch the center, secure it with 22-gauge floral wire or a pipe cleaner, and then fluff the loops.
The wired edges also make it easy to reshape the bow after storage. If one loop gets crushed inside a Christmas decoration box, simply bend it back into position.
How to Make a Simple Christmas Bow With Ribbon
You can make a simple Christmas bow with ribbon even if you are new to crafting. For small gifts, stockings, baskets, and narrow garlands, a basic two-loop method is usually enough.
Cut approximately 24 inches of ribbon for a small bow. Create two equal loops, pinch the center, secure it tightly, and trim the tails. If you are using non-wired ribbon, keep the loops slightly smaller because soft ribbon can lose its shape.
How to Make an Easy Christmas Bow
If you want an easy Christmas bow, start with a simple two-loop design instead of a large layered bow. This method requires less ribbon and is ideal for gifts, small trees, stockings, baskets, and quick holiday decorations.
Use about 24–36 inches of wired ribbon. Make two equal loops, leave two tails, pinch the center firmly, and secure it with a pipe cleaner or floral wire. Fluff the loops and adjust the tails until the bow looks balanced.
Once you are comfortable with this simple Christmas bow, you can increase the number of loops to create a fuller design for a wreath, Christmas tree, or door.
How to Make a Christmas Bow for Presents
A present bow should stay relatively compact so it doesn’t overwhelm the package. For a medium gift box, 24–36 inches of 1–2-inch ribbon is usually enough.
Wrap the ribbon around the box first, then make the bow separately or tie it directly at the center. Secure a handmade bow with double-sided tape, hot glue, or the existing gift ribbon.
For an elegant look, pair kraft paper with deep red velvet ribbon. For children, try green-and-white stripes with a small candy-cane ornament attached to the center.
How to Make a Christmas Bow for a Door
A front-door bow needs larger loops and longer tails because it must remain visible from several feet away. Use 4-inch wired ribbon and approximately 4–6 yards for a substantial statement bow.
Create 6–8 large loops and leave 18–24-inch tails. Secure the finished bow to a wreath, door hanger, railing, or sturdy hook.
If you’re attaching the bow directly to a door, avoid placing heavy embellishments on the center. A lightweight bow is easier to secure and won’t repeatedly pull against the attachment point.
How to Make a Christmas Bow for a Wreath
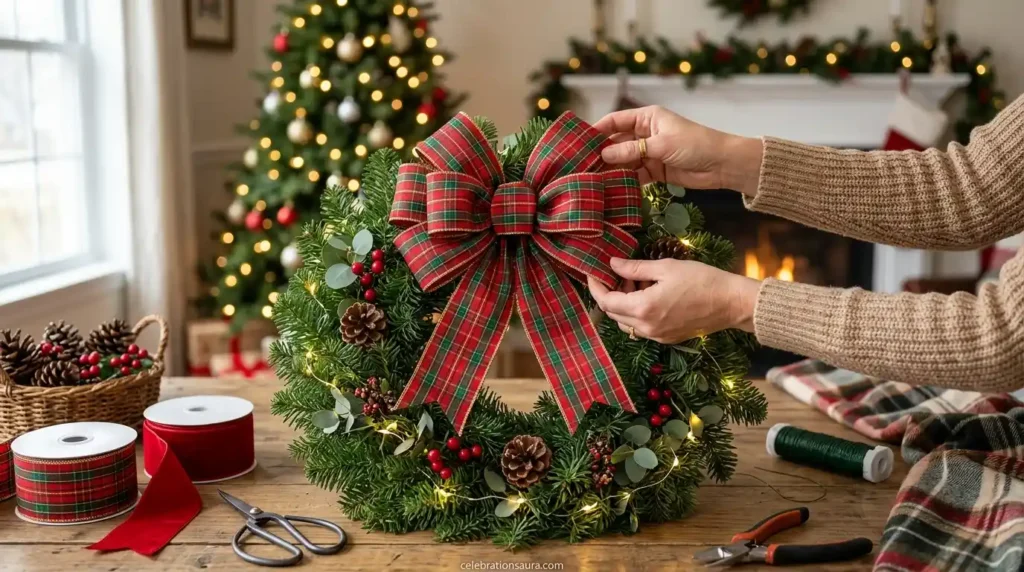
A wreath bow generally looks best when the loops spread wider than the greenery behind them. For a 22–24-inch wreath, use 3–5 yards of 2.5–4-inch wired ribbon. Make 6–8 loops, secure the center tightly, and leave two tails measuring roughly 18 inches. Attach the bow with floral wire by threading the wire through the wreath frame.
For a classic Christmas look, combine red plaid with a smaller gold ribbon. The layered colors will remain visible even when the wreath contains pinecones, berries, and ornaments.
How to Make a Christmas Bow Out of Ribbon
To make a Christmas bow out of ribbon, choose a material that matches the size and purpose of your decoration. Wired ribbon is easiest for large bows because it holds the shape, while satin and grosgrain work well for smaller gifts and decorations.
For a medium bow, cut 2–4 yards of ribbon and create 6–8 loops. Pinch the center after forming the loops, secure it with floral wire or a pipe cleaner, and then spread the loops apart. Finish by trimming the tails into a V shape or diagonal cut.
For a simple bow, you can use less ribbon and make only two or four loops. The same basic technique works for Christmas trees, wreaths, gifts, garlands, and doors.
How to Make a Christmas Bow Out of Paper
Paper bows are a useful alternative when you don’t have fabric ribbon. They work especially well for gift boxes, Christmas cards, table settings, and lightweight decorations. Use cardstock or decorative scrapbook paper measuring about 8.5 × 11 inches. Cut several strips, fold them into loops, and glue the ends together before layering them around a smaller center piece. Paper produces a crisper, flatter bow than wired ribbon. Therefore, it is best for packages and crafts rather than outdoor doors or large wreaths.
How to Make a Simple Two-Color Christmas Bow
A two-color bow instantly looks more layered without requiring a complicated technique. Choose one 2.5-inch ribbon and one 1.5-inch ribbon in complementary colors.
For example, combine red velvet with gold, green plaid with cream, or burgundy with champagne. Build the larger ribbon first, then add 3–4 smaller loops from the second ribbon.
Secure everything at the same center point. After fluffing, alternate the colors so no single shade becomes hidden.
How to Make a Layered Christmas Bow
Layered bows are excellent when you want a fuller centerpiece for a tree, wreath, or staircase garland. Use two or three ribbons with different widths rather than simply adding more loops.
Start with a 2.5–4-inch base ribbon. Add a 1.5–2-inch patterned ribbon on top, then finish with a narrow ⅝–1-inch ribbon through the center.
Keep the total number of loops around 6–10. Too many layers can make the bow heavy and difficult to secure.
How to Make a Big Christmas Bow for a Statement Display
For a dramatic bow, increase the ribbon length and loop size instead of simply adding dozens of loops. Use approximately 5–7 yards of 4-inch wired ribbon for a large doorway, staircase, or oversized tree.
Create 5–6-inch loops and 24-inch tails. Secure the center with strong floral wire, then spend several minutes separating every loop.
Large bows need a firm attachment point. Test the bow before hanging it so you can make sure the hook, wire, or branch can support the finished weight.
How to Make a Christmas Bow Without a Bow Maker
You do not need an EZ Bow Maker to create a professional-looking Christmas bow. Your hands, a measuring tape, and floral wire are enough.
A simple hand-tied method takes around 10–15 minutes after you have practiced once or twice. Keep one hand around the center while your other hand creates and twists each loop.
If you struggle to keep the center together, use a pipe cleaner temporarily. Once the bow is secure, you can cover the center with a small piece of decorative ribbon.
How to Make a Christmas Bow in 5 Minutes
When you’re decorating at the last minute, use a simple two-loop bow instead of a large layered design. Start with about 24 inches of wired ribbon.
Make two equal loops, leave two short tails, pinch the center, and secure it with a pipe cleaner. Shape the loops and trim the tails.
This method is especially useful for quick gift wrapping, napkin decorations, small wreaths, and Christmas baskets. Some current tutorials also use approximately five minutes as a realistic target for simple ribbon projects.
How to Make a Christmas Bow Look Fuller
The secret to a fuller bow is spacing, not simply using more ribbon. Once the center is secured, pull each loop away from the center and angle neighboring loops in different directions.
For a 6–8-loop bow, position two loops upward, two sideways, and the remaining loops between those angles. This creates depth instead of a flat circular shape.
You can also gently bend the wired edges backward. That small curve gives each loop more volume and keeps the bow looking lively.
How to Make Christmas Bow Tails Look Professional
Well-shaped tails can make a simple bow look much more polished. For medium bows, aim for 10–18-inch tails; large wreath or door bows can use 18–24 inches.
Cut each tail at the same length first. Then fold the ribbon lengthwise and make one diagonal cut from the folded edge toward the wired edge to create a clean V-shaped finish.
If you prefer a softer appearance, cut the ends diagonally instead. The diagonal finish works particularly well with velvet and wide wired ribbon.
How to Choose the Right Bow for Your Project
Not every Christmas bow needs the same ribbon width or amount of material. Choosing according to the display prevents the bow from looking either tiny or overwhelming.
| Project | Ribbon | Approx. ribbon amount | Best loop size |
|---|---|---|---|
| Small present | 1–2 inches | 24–36 inches | 2–3 inches |
| Christmas tree | 2.5 inches | 3–5 yards | 4–5 inches |
| Wreath | 2.5–4 inches | 3–5 yards | 4–6 inches |
| Front door | 4 inches | 4–6 yards | 5–7 inches |
| Tree topper | 2.5–4 inches | 4–6 yards | 5–7 inches |
For beginners, wired ribbon is the easiest choice because it holds the shape while you’re adjusting the loops. Soft ribbon can look beautiful, but it usually requires more careful handling.
Common Christmas Bow Mistakes to Avoid
The most common mistake is making uneven loops. Measure the first loop and use it as your reference for the remaining loops.
Another problem is failing to twist one-sided ribbon. If you skip the twist, the patterned side may face inward on some loops.
Finally, don’t skip fluffing. Even a well-built bow can look flat immediately after securing it. Spend 2–3 minutes separating and shaping every loop before deciding that the bow isn’t working.
For more holiday decorating inspiration, you can also pair your finished bow with Christmas light display ideas or coordinate it with your other Christmas decorating ideas.
Wired Ribbon vs. Regular Ribbon: Which Is Better?
Wired ribbon works best for large decorative bows because its edges help loops stay upright and hold their shape. For small gifts and simple bows, regular ribbon can be a better choice. The wired edges also make reshaping easier, so you can adjust the bow until it looks full and balanced.
Regular satin or grosgrain ribbon can create softer bows, but the loops may droop after hanging. For a beginner making a tree topper, wreath bow, or door decoration, wired ribbon is the safer choice.
For a small present, however, a soft 1-inch ribbon can create a delicate finish without the structure of a large wired bow.
How Long Does It Take to Make a Christmas Bow?
A small two-loop bow can take about 5 minutes, while a full 6–8-loop wired bow usually takes 10–15 minutes. A large layered door or tree-topper bow may take 15–25 minutes.
Your first bow will probably take longer because you’ll spend extra time measuring and adjusting the loops. After making two or three, the process becomes much faster.
If you’re preparing bows for an entire tree, make one perfect sample first. Then use its loop size and tail length as your template for the remaining bows.
How Much Does It Cost to Make a Christmas Bow?
A simple homemade bow can cost around $2–$5 when you already have scissors and wire. A larger designer-style bow may cost $8–$20 depending on ribbon quality and how many different ribbons you layer.
Budget-friendly craft-store ribbon works perfectly well for beginners. If you’re making several bows, buying a larger roll can reduce the cost per bow.
For a polished look, spend more on the ribbon rather than buying unnecessary tools. Good wired ribbon does most of the shaping work for you.
Can You Make Christmas Bows Ahead of Time?
Yes, you can make Christmas bows several weeks before decorating. Prepare them in November or early December and store them loosely in a large box or breathable storage container.
Don’t crush the loops under heavy decorations. Instead, place tissue paper around the bow or hang large bows individually.
When you’re ready to decorate, gently reshape the wired loops. Most wired ribbon can be fluffed back into shape in just a few minutes.
Final Thoughts
Making a Christmas bow becomes much easier once you understand the simple rhythm: create equal loops, pinch the center, secure it tightly, and fluff everything into shape. You don’t need expensive equipment or years of crafting experience.
For your first project, start with a 2.5-inch wired ribbon and make a medium 6–8-loop bow. Give yourself about 15 minutes, and don’t worry if the first version looks messy before you fluff it. The wired edges make it surprisingly easy to reshape.
Once you’re comfortable with the basic method, try layering red and gold ribbon, extending the tails for a wreath, or creating a larger version for the top of your tree. The best part is that you can adjust the size and colors to match your own Christmas style.
So grab your favorite ribbon, make your first bow, and give it your own festive twist!
FAQs
The easiest way to make a Christmas bow is to use 2.5-inch wired ribbon, create two to six pairs of loops, and secure the pinched center with floral wire or a pipe cleaner. Wired ribbon is forgiving because you can reshape the loops after tying.
You generally need 2–4 yards of ribbon for a medium decorative bow and 4–6 yards for a large tree topper, wreath, or door bow. Small gift bows may need only 24–36 inches.
A 2.5-inch ribbon is the most versatile size for Christmas bows because it works for trees, wreaths, garlands, and medium decorations. Use 4-inch ribbon when you want a larger statement bow.
Secure the center tightly with floral wire, a pipe cleaner, or a strong zip tie. After securing it, pull each loop individually so the tension is distributed evenly rather than concentrated in one section.
vYes, you can make a Christmas bow without wired ribbon, but soft ribbon generally creates a less structured shape. Satin, grosgrain, velvet, and paper can all work when you choose a bow size appropriate for the material.
Discover More
How to Fluff a Christmas Tree for a Full, Realistic Look
Blue Christmas Nails: 22 Icy, Sparkly Ideas for the Holidays
Easy Christmas Treats: 25 Simple Ideas Everyone Will Love
Christmas Wishes and Mistletoe Kisses: 21 Best Messages
